Ethernet

Ethernet Wiring

For wiring information click here: Ethernet Wiring

IP Configuration

The Emtune software will communicate to the ECU over a static IP address.

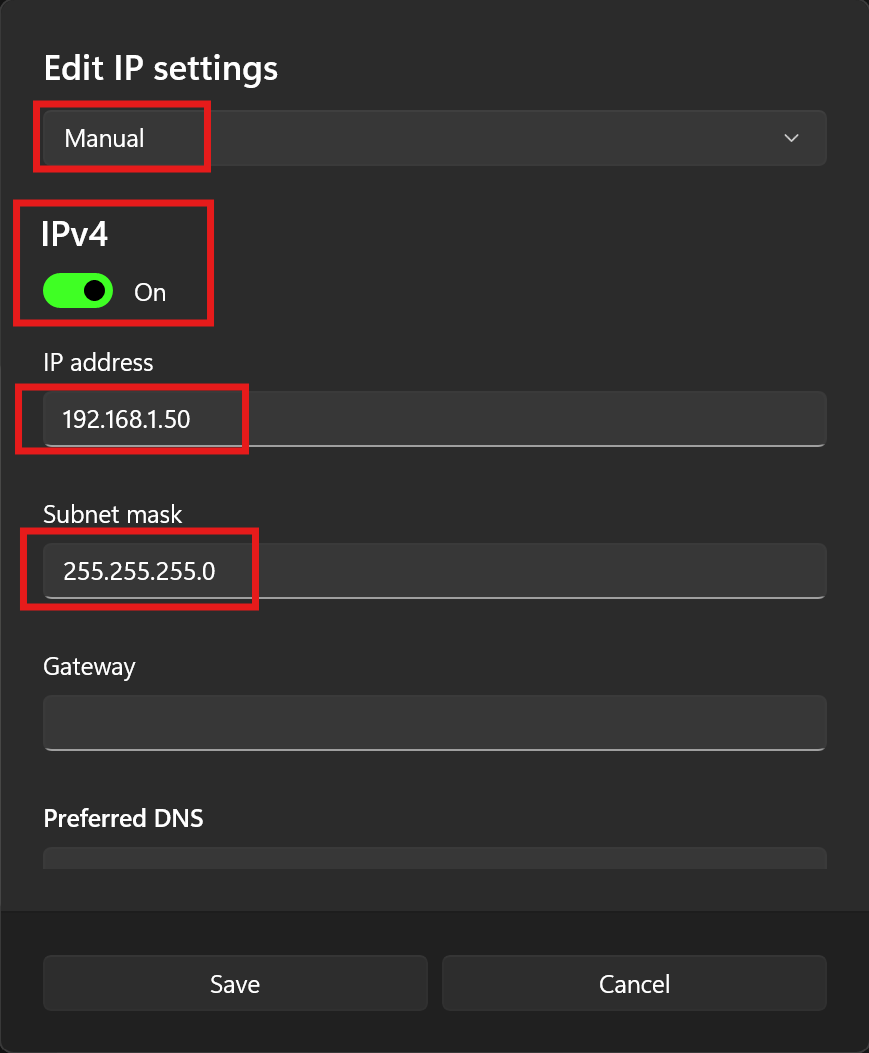
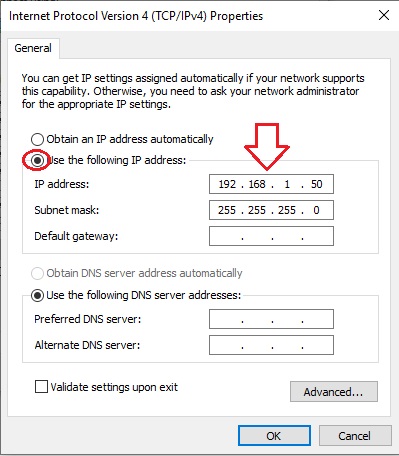
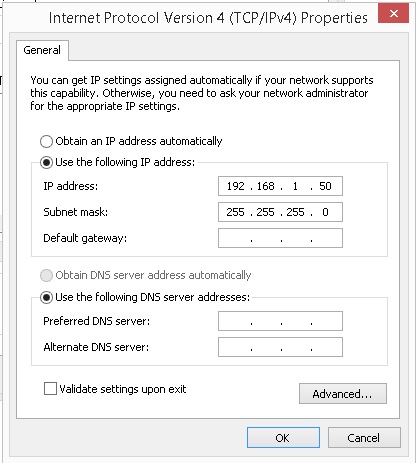
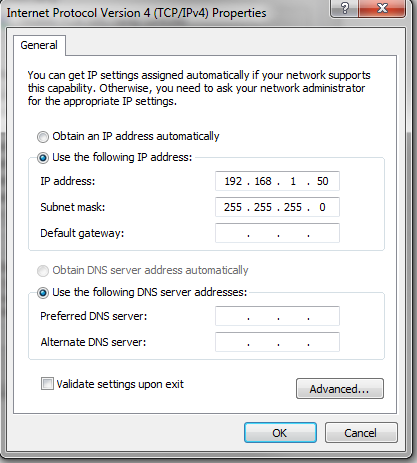
Set your IP and subnet to the following on the Ethernet port you will be using on your PC.

IP: 192.168.1.50

Subnet: 255.255.255.0
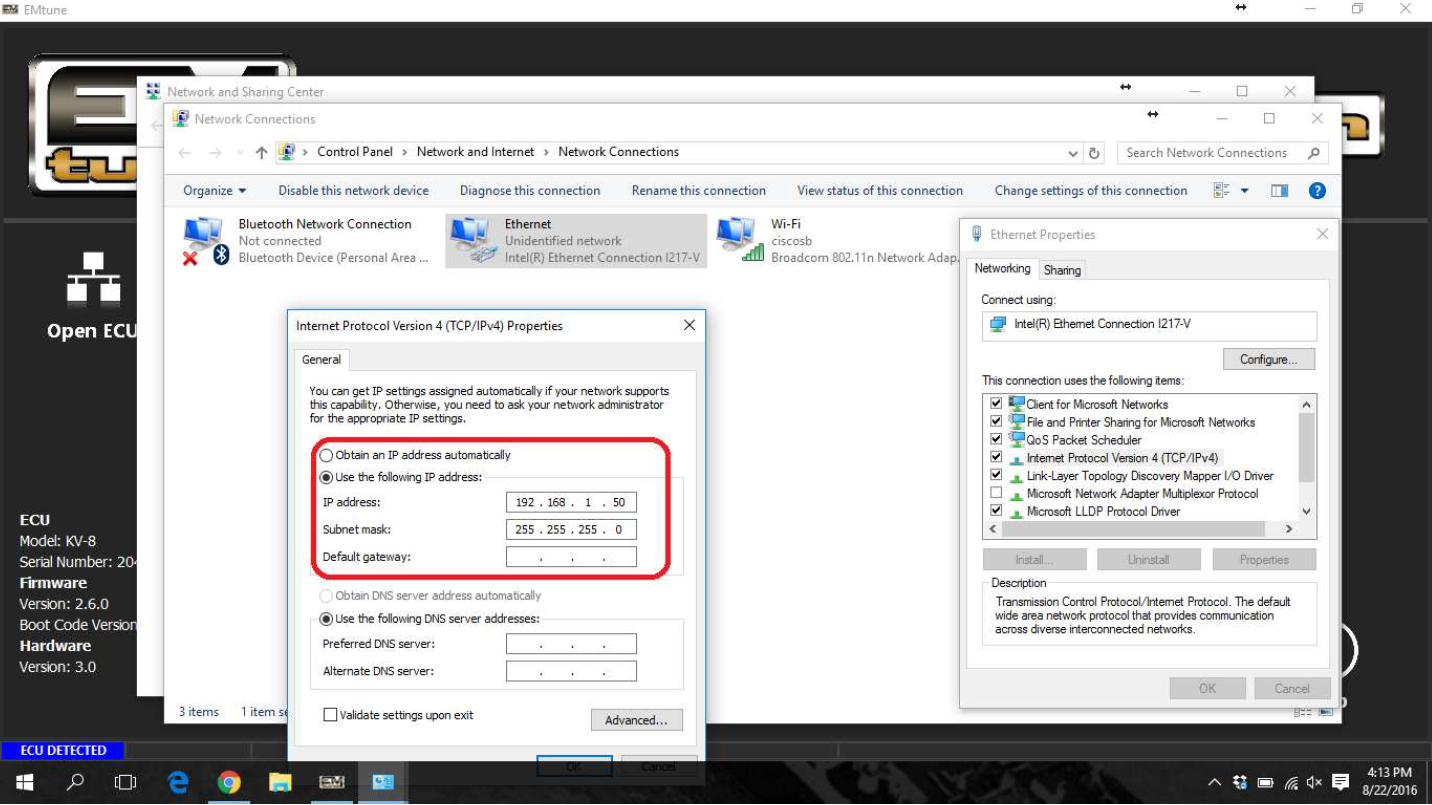
Image Image

With successful connection, the Emtune Welcome screen will display “ECU DETECTED” in blue in the bottom left corner as can be observed in the background in the above example.

Auto IP Config

Emtune 1.20.0 and onwards includes a wizard to help configure the ethernet connection (Bottom right of the splash screen)

The wizard may fail to configure the adapter if a previously used adapter was set to the same IP address. Windows can be very finicky about this.
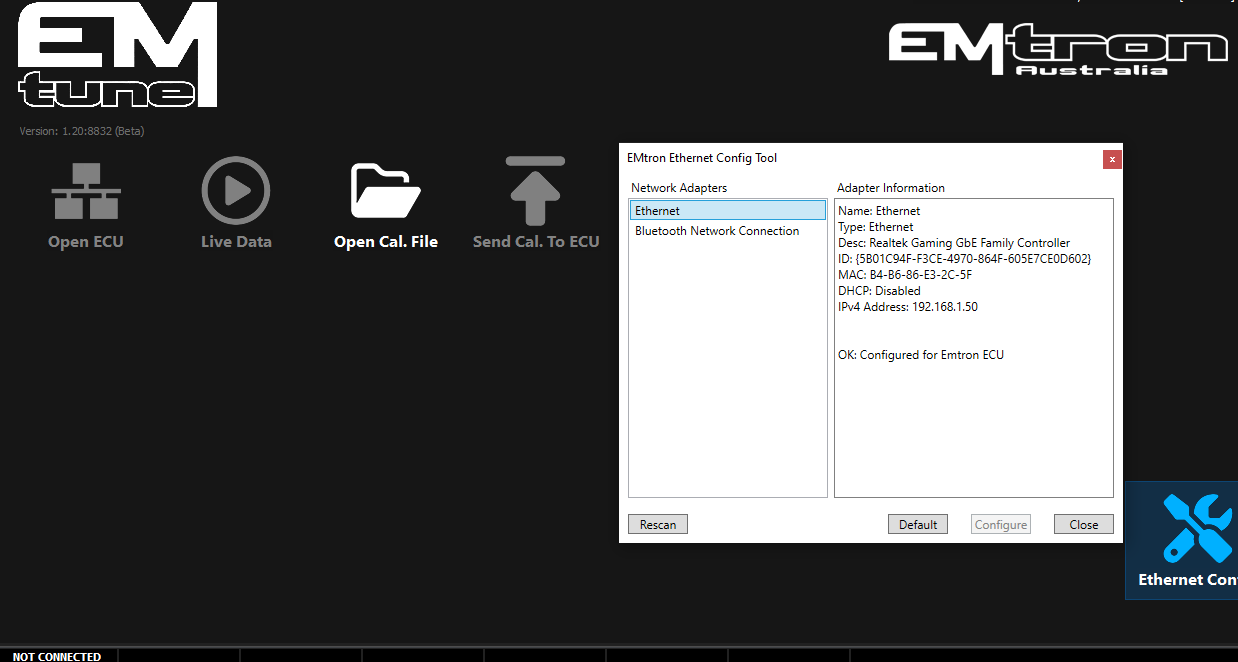
Image Image

This will be visible when an ECU is no connected / detected.

When the ECU is connected & the IP address correctly configure, the software will acknowledge this in the bottom left corner.
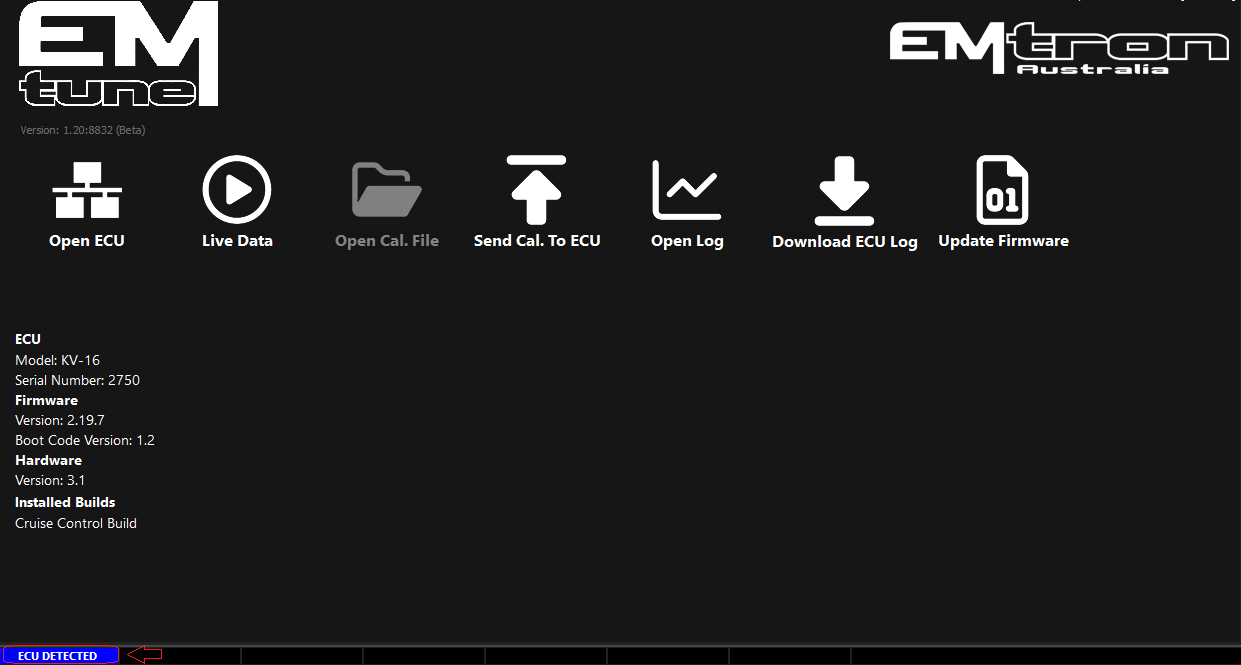
Image Image

The process to manually configure windows 11+ is as follows:

Manual IP Config

Info on configuring the IP address for different windows version can be found here:

Troubleshooting

When a correctly configured Ethernet port is in use together with a known good communication cable and you remain unable to establish a connection.

Power supply to the ECU must be verified. That is, the next step is to determine if the ECU is powering up.

Without voltage to the ECU supply pin.

The ECU will fail to power up thereby making communication impossible.

For the KV Series ECU’s this is pin D1
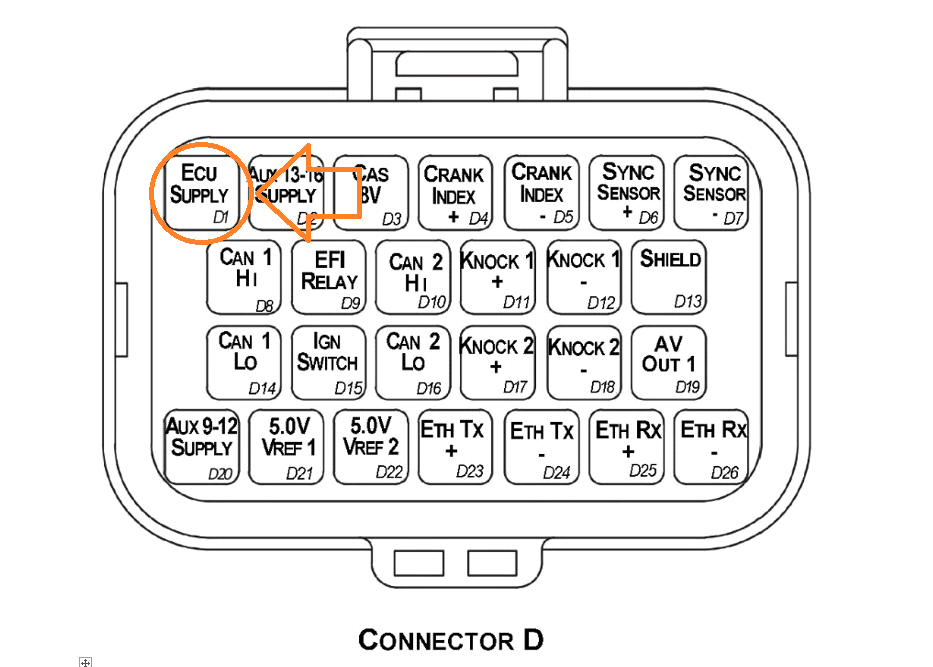
Image Image

For the SL series ECU’s, this is pin B1
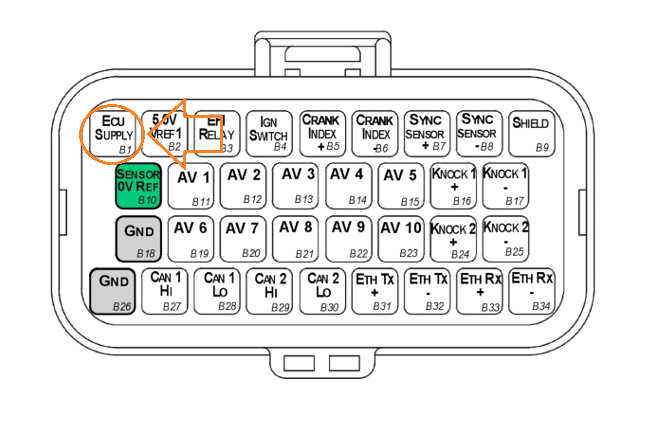
Image Image

If 12V is not present at D1/B1 with ignition ON, you will need to determine the power supply fault.
Copyright © 2026 Emtron Australia Pty Ltd

Subsections of Ethernet

Windows 11

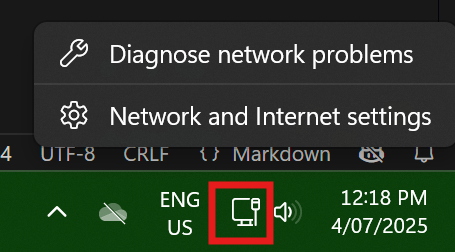
  1. Right click on the Network Connection icon in the system tray. It may appear as a wired connection or a wifi icon. Image Image

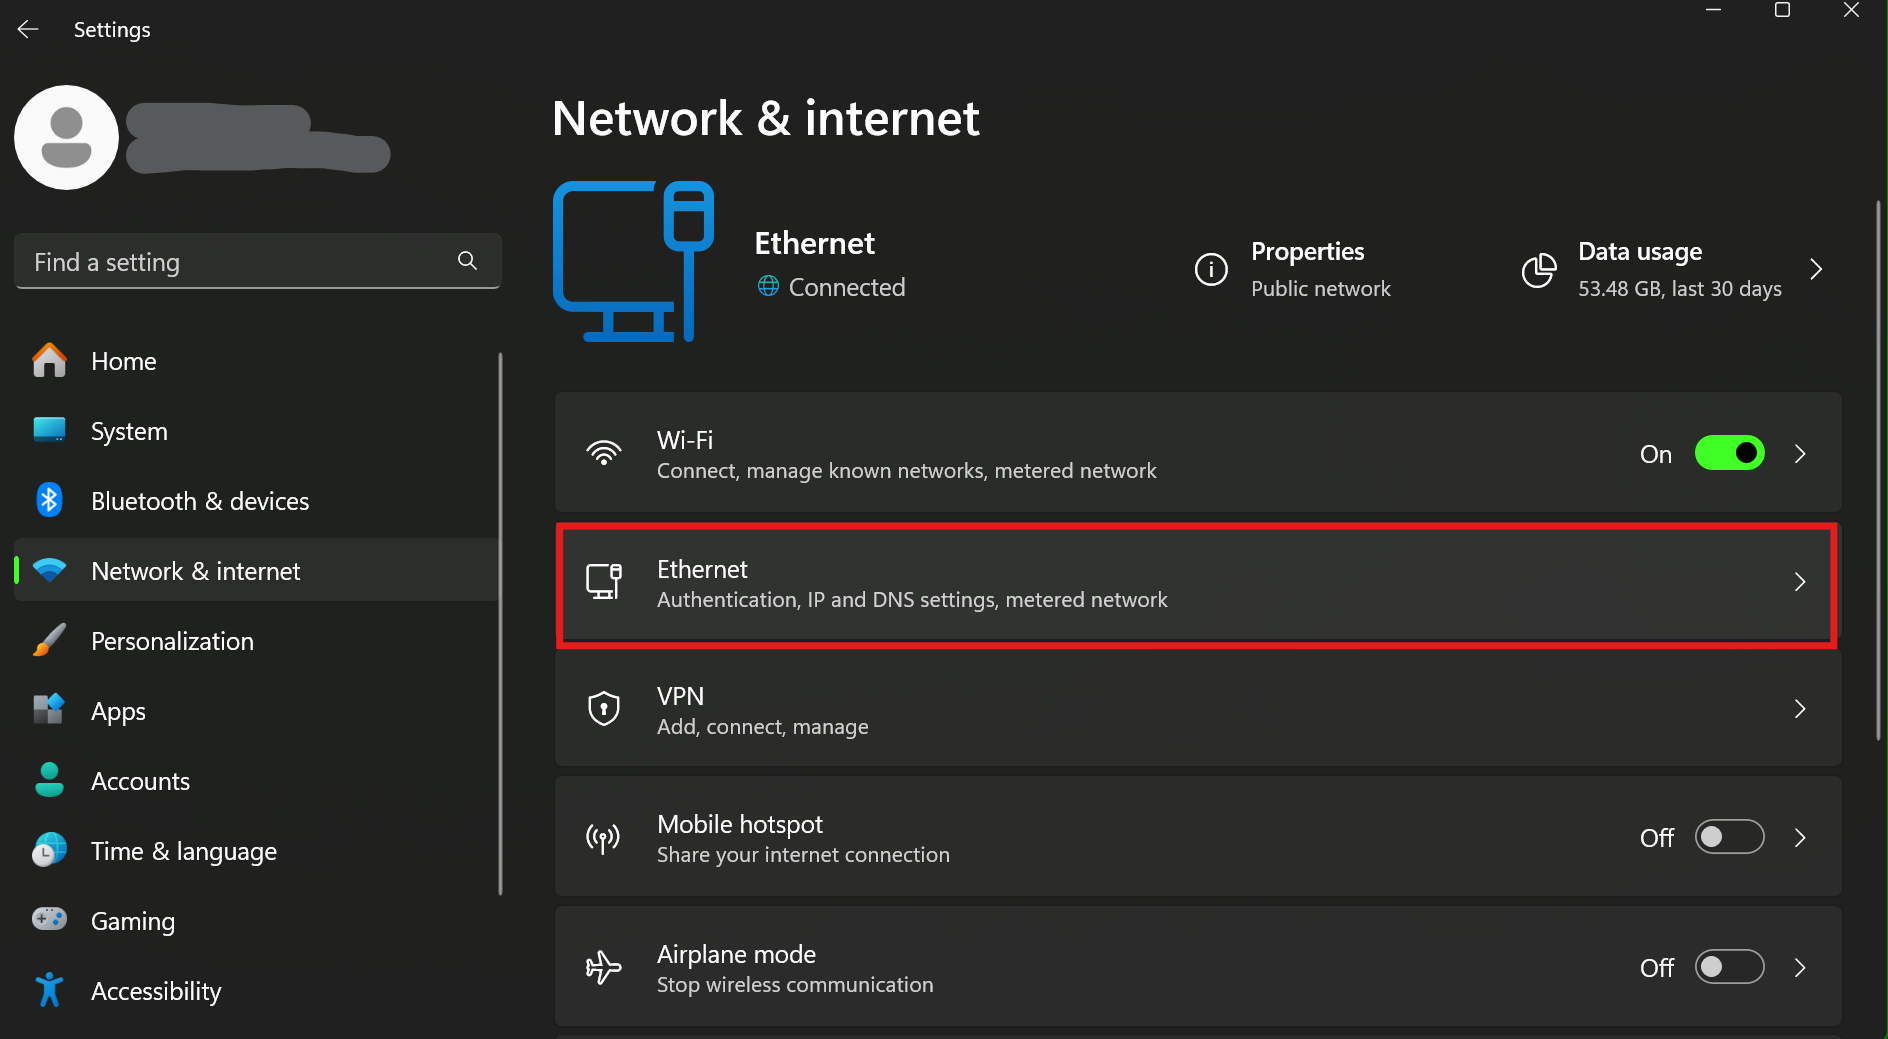
  2. Click on Ethernet Image Image

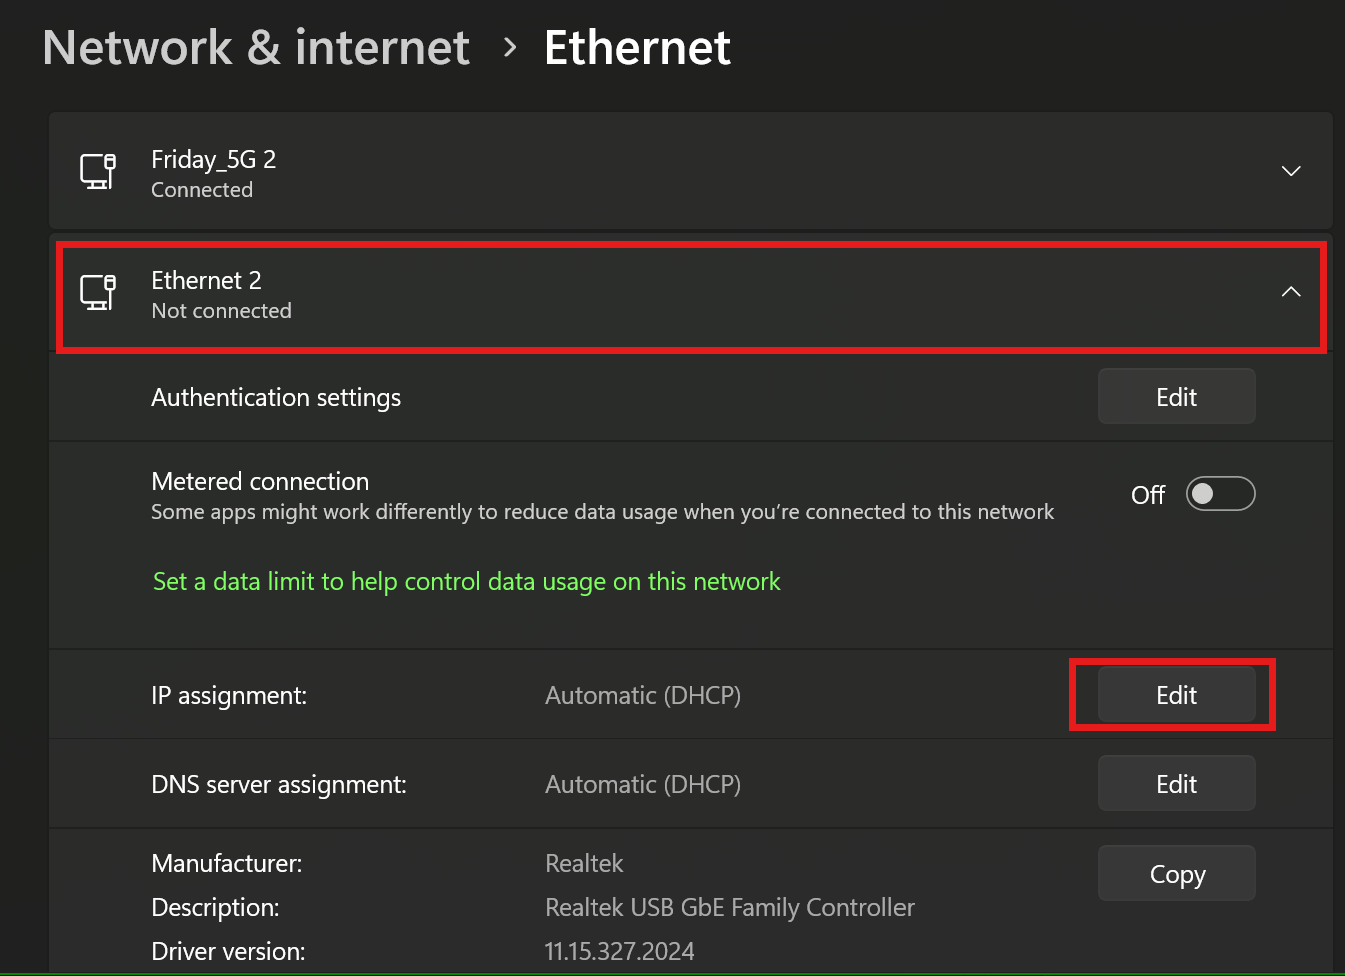
  3. Expand the settings for your ethernet adapter and click on the Edit button for IP Assignment. Image Image

  4. Set it to Manual, turn on IPv4, and enter the emtron IP Address and Subnet mask. Image Image

  5. Click Save.

  6. Done. Connect the Emtron Ethernet cable.

Copyright © 2026 Emtron Australia Pty Ltd

Windows 10

To setup the Ethernet on Windows 10 ready for the ECU connection use the following steps.

Image Image

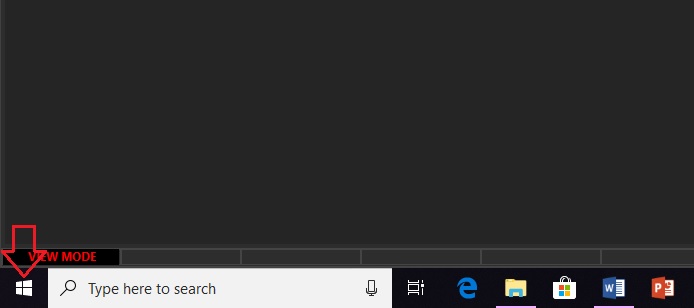
  • Left Click Windows Icon - Bottom Left corner

Image Image

  • Left Click Settings Icon - 2nd from bottom on Left

Image Image

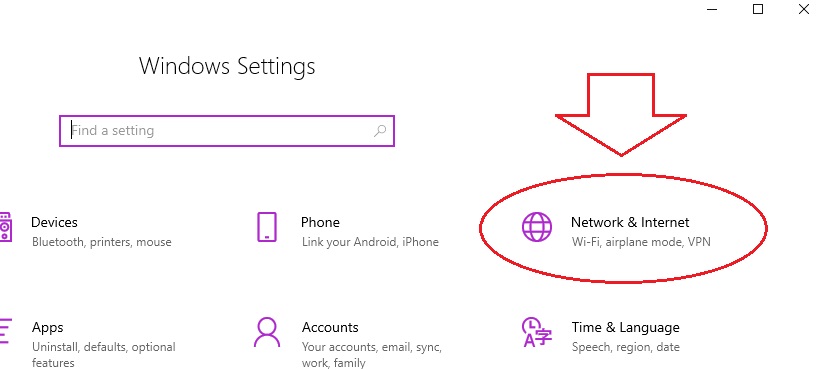
  • Left Click “Network & Internet” - Top Right

Image Image

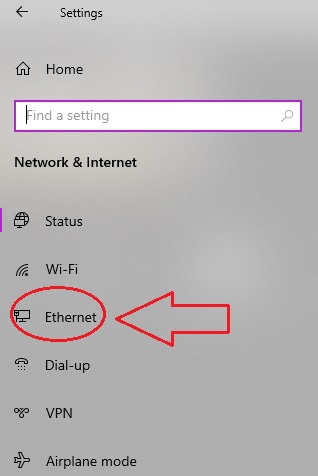
  • Left Click “Ethernet” - 4th from Top on the Left

Image Image

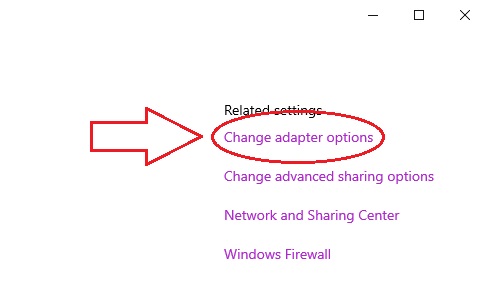
  • Left Click “Change Adapter Options” - Top Right

Image Image

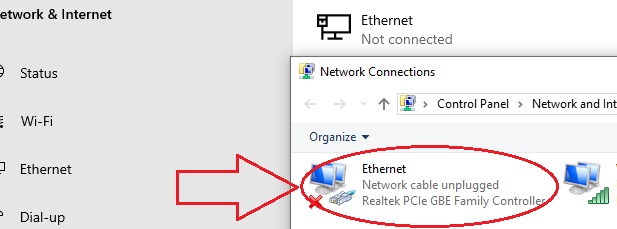
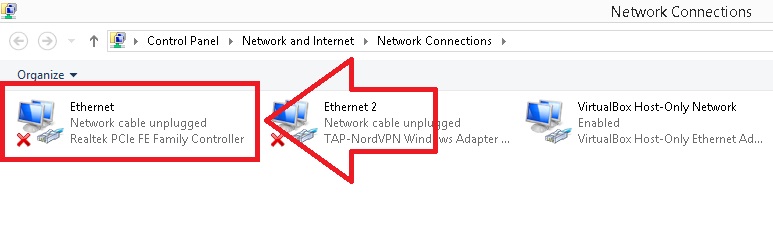
  • Right Click “Ethernet”

Image Image

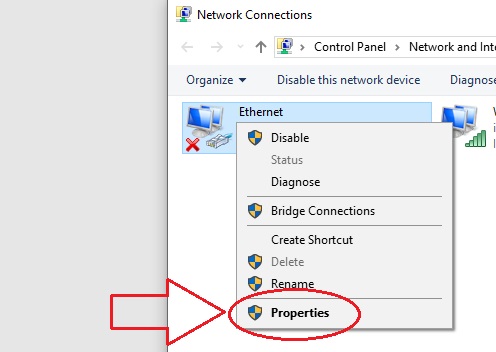
  • Left Click “Properties”

Image Image

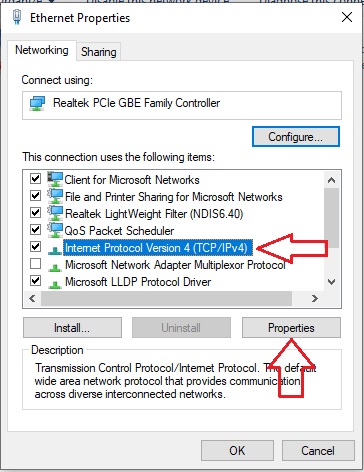
  • Select “Internet Protocol Version 4 (TCP/IPv4) and Left Click “Properties”

Image Image

  • Use the following IP address

Image Image

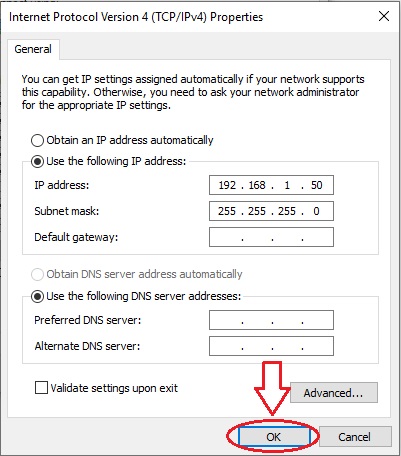
  • Left Click “OK” and exit, the process is complete
  • Done. Connect the Emtron Ethernet cable.

Copyright © 2026 Emtron Australia Pty Ltd

Windows 8.1

To setup the Ethernet on Windows 8.1 ready for the ECU connection use the following steps.

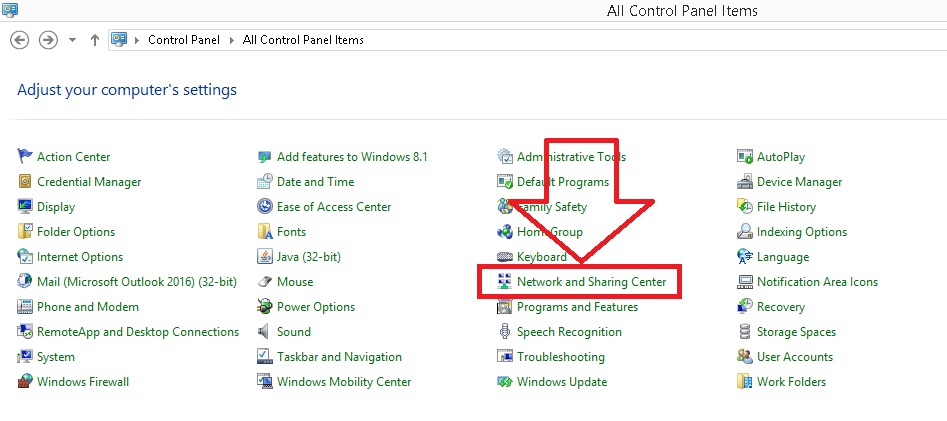
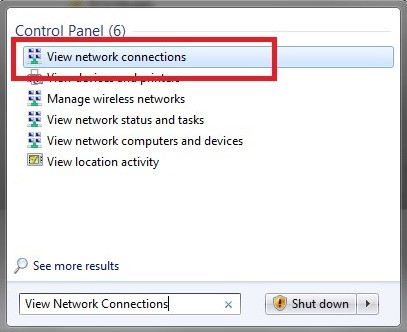
  • Type “View Network Connections” into the search window, accessed from the start menu. Windows should provide a list of results. Select View Network Connections.

Image Image

Or alternatively if the search function doesn’t provide this:

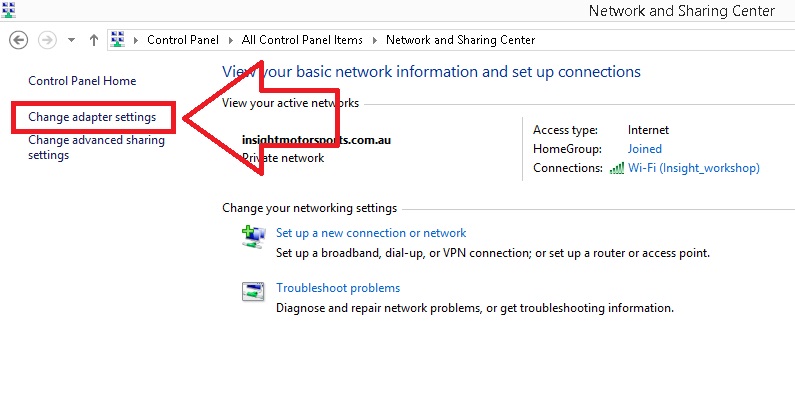
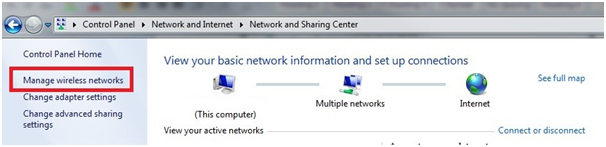
Start > Control Panel > Network and Sharing Center. Once in this menu select “Change Adapter Settings”

Image Image

  • Once in this menu select “Change Adapter Settings”

Image Image

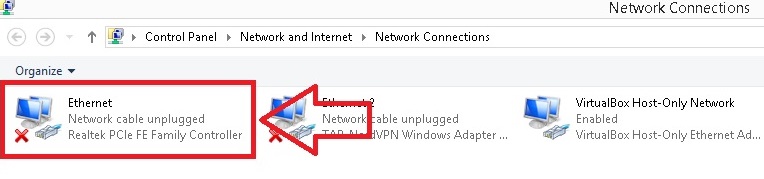
  • The below menu should be visible. Select “Ethernet”

Image Image

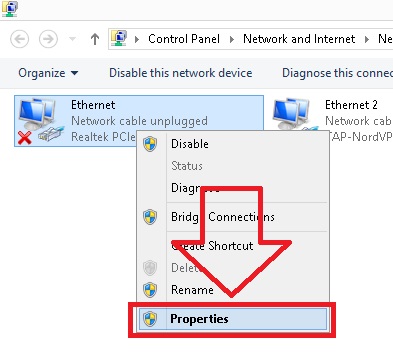
  • Right click to Access Properties

Image Image

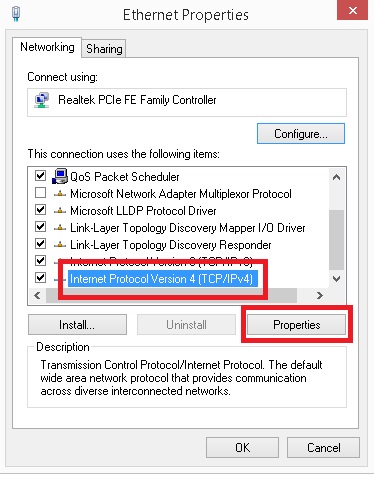
  • Select TCP/IPv4 then click Properties

Image Image

  • Select “Use the following IP address” and enter in the address 192.168.1.50. The Subnet should automatically default to 255.255.255.0. Click OK.

Image Image

  • Done. Connect the Emtron Ethernet cable.

Copyright © 2026 Emtron Australia Pty Ltd

Windows 7

To setup the Ethernet on Windows 7 ready for the ECU connection use the following steps.

  • Type “View Network Connections” into the search window, accessed from the start menu. Windows should provide a list of results. Select View Network Connections.

Image Image

or alternatively if the search function doesn’t provide this:

Start > Control Panel > Network and Internet > Network and Sharing Center. Once in this menu select “Change Adapter Settings”

Image Image

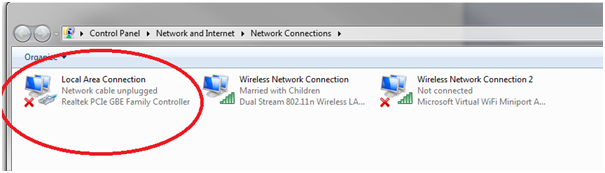
  • The below menu should be visible. Select “Local Area Connection”

Image Image

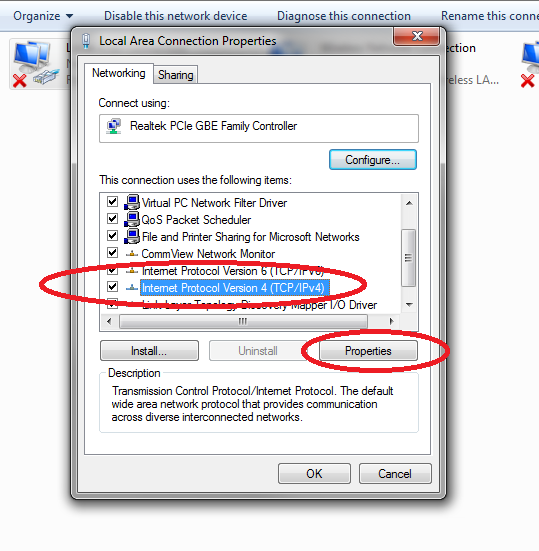
  • Select TCP/IPv4 then click Properties

Image Image

  • Select “Use the following IP address” and enter in the address 192.168.1.50. The Subnet should automatically default to 255.255.255.0. Click OK.

Image Image

  • Done. Connect the Emtron Ethernet cable.

Copyright © 2026 Emtron Australia Pty Ltd

Windows XP

Emtune is no longer developed to offer Windows XP compatibility.